Saturday 29 December 2018

Bonnie Hunter's Quiltville Mystery "Good Fortune" Step 6

Step 6 of Good Fortune was to sew together some neutral strips similar to sewing together the orange strips in step 4.  However, I only have two small bits of two neutrals and then a lot of a third so I decided to just cut my third neutral fabric into the long narrow rectangles required.  So here is my project box with everything ready to go so far.


So, hopefully step 7 is when we start sewing things together!

#quiltville #quiltvillemystery #goodfortunequilt

Friday 21 December 2018

Bonnie Hunter's Quiltville Mystery "Good Fortune", Step 5 Finished

Step 5 for Bonnie Hunter's Mystery Quilt "Good Fortune" came out this morning.  She's being easy on us with clues 4 and 5 as they didn't require as much work or as many blocks to be made as in previous steps.


Here are all my blocks so far.


Next clue we have to be sewing some of these blocks together for sure!

#quiltville #quiltvillemystery #goodfortunequilt

Linking to http://quiltville.blogspot.com/2018/12/mystery-monday-link-up-part-5.html

Friday 14 December 2018

Bonnie Hunter's Quiltville Mystery "Good Fortune" Step 4 done

Clue number 4 for "Good Fortune" came out this morning and I went right to the sewing room and got it done.  I chose to do strip piecing rather than string piecing as I am working from yardage not scraps.  Here are all my coral rectangles.


And a picture of all my pieces together.


Now another week to wait until clue 5.  Will we start putting pieces together or continue to make more pieces?

#quiltville #quiltvillemystery #goodfortunequilt

Linking to http://quiltville.blogspot.com/2018/12/mystery-monday-link-up-part-4.html

Sunday 9 December 2018

Bonnie Hunter's Quiltville Mystery "Good Fortune", Step 3 Done

Clue number 3 came out on Friday and I finished the green chevrons and half-square triangles shortly after noon today.


And just for fun, here's a picture of all the pieces made so far.


Looking forward to clue number 4.

#quiltville #quiltvillemystery #goodfortunequilt

Linking to http://quiltville.blogspot.com/2018/12/mystery-monday-link-up-part-3.html

Friday 7 December 2018

Pincushion With Attached Thread Catcher or Sewing Tool Storage Bag

I found a free pattern for a Pincushion Thread Catcher on AllFreeSewing.com.  Here's the link:  https://www.merrimentdesign.com/pincushion-thread-catcher.php  I filled the weighted pincushion area with sand inside of another fabric pouch so there are two layers to prevent sand seepage.  It is heavy enough and the bag is big enough that you could also use it to hold some sewing tools, not just thread.


Here's a side view so you can see the pretty print with cats, birds, thread spools and measuring tapes.  Speaking of measuring tapes, instead of making straps out of fabric as instructed in the pattern, I had some ribbon tape printed like measuring tape which came on a bundle of fabric.  I saved it and used it for my straps.


The pattern called for clothesline wire to make the circle to hold open the bag but I didn't have any and figured it would also be fairly heavy.  I have also seen patterns use fish tank tubing which would have worked and been light but I didn't have any of that either.  I went exploring in the workshop and found a piece of lightweight plastic tubing for inserting screens into their frames.  It worked great.  Here's what it looks like.


I liked the pattern enough that I made a second pincushion thread catcher.  This fabric has pincushions, spools of thread and cats in baskets.


And I made a third one with cats and stacks of fabric and balls of yarn.  This one shows how you can fold the bag flat when not in use without affecting the tubing holding the mouth of the bag open.


I'm keeping this last one for myself.  The other two have been gifted.

Linking to Crazy Mom Quilts for Finish it up Friday

Thursday 6 December 2018

Red and White Scandanavian Inspired Quilt

I made this quilt several years ago.  I made the centre by just looking at a picture of a cushion and sewing together a grid of  2.5" squares of red and white fabric.  Some of the red fabric and all of the white fabric were snowflake prints.  It turned out so well, I went looking for some Scandinavian sweater inspired motives to make a frame around the reindeer and I came across this tutorial http://thecraftyquilter.com/2014/11/nordic-mini-quilt-along-row-1/.   I made my pieces 50% bigger than the pattern called for and then I added a border of larger red squares.


I bound it in a red and white striped fabric and backed it with a red and white checked flannel fabric so it was nice and snuggly.


Of course, it wouldn't have been all coordinated without quilting it with an allover snowflake pattern!

Tuesday 4 December 2018

Yeah!!! Additional Borders Now on Bonnie Hunter's Quiltville Mystery "On Ringo Lake" Quilt

Yeah, now I just have to quilt this top!  Here is a picture with the lights on.


And here's a picture with the lights off which I think shows the true colours of the quilt a bit better without as much yellow in it.


Now to work on something that has to be done for Thursday which I can show you on Friday.

#quiltville #quiltvillemystery #onringolakequilt

Linking to Wendy's Quilts and More Peacock Party

Sunday 2 December 2018

Bonnie Hunter's Quiltville Mystery "Good Fortune" - Step 2 Completed

I am happy to say I now have Step 2 completed for the "Good Fortune" quilt.   Dozens and dozens of navy and neutral half-square triangles have been made.


Which colour will we be sewing with next, green, coral or maybe red again?

#quiltville #quiltvillemystery #goodfortunequilt

Linking to https://quiltville.blogspot.com/2018/12/mystery-monday-link-up-part-2.html

Friday 30 November 2018

Bonnie Hunter's Quiltville Mysteries, "Good Fortune" Step 2 and "On Ringo Lake" Borders

Clue number 2 came out today for the "Good Fortune" quilt.  I now have a couple dozen less than half of the required half-square triangles made using the navy and neutral fabric.  Lots more dozens to go!


I have also been working on"On Ringo Lake" and now have all the pieces made for the additional border.  So now I just have to trim up the quilt and sew the borders on.


Sorry for the weird angle for the picture, but my sewing table is in the way of getting a picture front on to my design wall if I want to capture all the way to the floor.  I am really liking the dark brown edge to the quilt!

#quiltville #quiltvillemystery #onringolakequilt #goodfortunequilt

Monday 26 November 2018

Two Borders Ready to Go on Bonnie Hunter's Quiltviile Mystery "On Ringo Lake"

I have made all the nine patches and have two borders pieced together to go on the quilt.  I was going to change the corner setting triangles, but I don't have a big enough piece of turquoise fabric left to use so they will stay as is.  I was hoping to bind it with turquoise fabric too, but will have to use brown or peach.  I like a dark binding so will likely use brown if I have enough.  I have lots of peach.


Getting there!

#quiltville #quiltvillemystery #onringolakequilt

Sunday 25 November 2018

Step 1 Completed for Bonnie Hunter's Quiltville Mystery "Good Fortune"

A new project and new fabric always makes me enthusiastic to sew!   I used three different red fabrics and three different neutral fabrics to make dozens and dozens and then more dozens and dozens of four-patches required for step 1.  Here they are on top of the solid colours of fabric I have chosen for my rendition of "Good Fortune".


Now I have five days to work on other sewing projects until the next clue comes out.

#quiltville #quiltvillemystery #goodfortunequilt

Linking to  Bonnie Hunter's "Good Fortune" Mystery Monday Linkup

Friday 23 November 2018

Bonnie Hunter's Mystery Quilts "On Ringo Lake" and "Good Fortune"

Last night I worked out the border I want to add to Bonnie Hunter's "On Ringo Lake" quilt.  It will give me an additional 5" so I will then have a 13" overhang.   Here's a small sample of what it will look like.  I have about one-third of the 74 nine-patches done.


I really didn't think I would participate in this year's mystery quilt because I didn't think I had any suitable fabric and I didn't want to go out and buy any.  However, I remembered I had bought several different bundles of Bonnie and Camille fabric at a garage sale and they might contain suitable colours.  So this is the fabric I decided to use.  Everything is Bonnie and Camille except the larger piece of coral fabric which, coincidentally, was also used in my "On Ringo Lake" quilt.


My blue is darker than Bonnie's and my green is lighter and I am using coral instead of orange, which I prefer.  Since this is a collection of fabric, I know these colours will work with each other.  Red is the same and the neutral background fabric is the same.

This is how much fabric I decided not to use, enough for another quilt.  I could have used turquoise instead of the green, but I think the green adds more pop.


So the first clue today was to make a very large number of fairly small red and neutral four patches.  I have about two-thirds of them done already.


If you are tempted, here's the link to Bonnie Hunter's website and her "Good Fortune" mystery quilt.  I'll be in the sewing room.

#quiltville #quiltvillemystery #onringolakequilt #goodfortunequilt

Thursday 22 November 2018

Bonnie Hunter's Quiltville Mystery "On Ringo Lake" is Now a Finished Quilt Top ...... Kind of ......

I am pleased to say that today, the day before Bonnie Hunter's next mystery quilt starts, I have finished piecing her previous mystery quilt!  
 

It currently measures 76" x 91".  On a 60" wide queen size bed, the drop on each side would only be 8" which is rather skimpy on today's thick mattresses.  If I could add at least 4" on each side, it would then have a 12" drop.   So, I am contemplating doing something to make this quilt bigger.  I am thinking of making nine patches with brown centres and turquoise corners since they already appear in the quilt in the centre of each block and where the sashing meets at each cornerstone.   They would run on point around the quilt and be put together with a combination of peach and brown setting triangles.  I also think I will replace the current corner fabric.  So, back to the sewing room!

#quiltville #quiltvillemystery #onringolakequilt

Wednesday 14 November 2018

A Star Striped Star!

I wasn't even trying to be this accurate with the stripes, but sometimes symmetry just works out.  This is a 12.5" unfinished block.


I love how the centre stripe in the top and bottom hour glass blocks point at each other in the middle.  I was going to sew the centre square with the stripes running vertically instead of horizontally, but the stripes matched up so well with the side hour glass blocks, I had to put them running the same way.  Was it a fluke, or could I produce this again?

Tuesday 13 November 2018

A Small Finish and Progress on a Bigger Project

Yesterday I put binding on the nine patch X and O Comfort Quilt and threw it in the wash.  I used three different strips of reddish fabric so the binding is as scrappy as the quilt.  Today it is all crinkly and finished.  Here's a picture indoors which shows the texture but the colours are rather dark.


Here are two more picture outside which show the colour better but less texture.  The quilt is about 28" square.


Today I worked on Bonnie Hunter's "On Ringo Lake" and have rows put together up to the half way point.


I thought it would take longer putting it together, so I am pleasantly surprised!

Sunday 11 November 2018

Bonnie Hunter's Quiltville Mystery Quilts

Bonnie Hunter recently announced the colours for this year's Good Fortune Mystery Quilt.  I'm not sure if I'm going to make it or not, but I told myself that I had to finish putting together last year's "On Ringo Lake Mystery Quilt" before the new one starts.  I only had eleven blocks left to put together with all the parts already made.  I worked on them on Wednesday and then again on Saturday and the blocks are now all done.  I also had to finish making the setting triangles and that is now all done too.  So, I have started to put together the quilt top.  This is how far along I got yesterday.  The first two diagonal rows are sewn together and the third row is laid out and ready to sew.


The first clue for the new Quiltville Mystery Quilt comes out on Friday 23 November so I have almost two weeks to finish putting this together.  This is loads of time to meet my goal and to decide whether to make her next one or not.

#quiltville #quiltvillemystery #onringolakequilt

Sunday 4 November 2018

Wheee! Free Motion Quilting on an X & O Comfort Quilt

As mentioned in a few of my recent blogs, I have built up a number of quilt tops which require quilting.  I always find it a bit intimidating deciding how to quilt a quilt and feeling my skills don't measure up.  I know that my Free Motion quilting skills are weak and there is no way to get better than to practise.  To just "dip my toe in", I decided to start with the smallest quilt I had in the pile. 

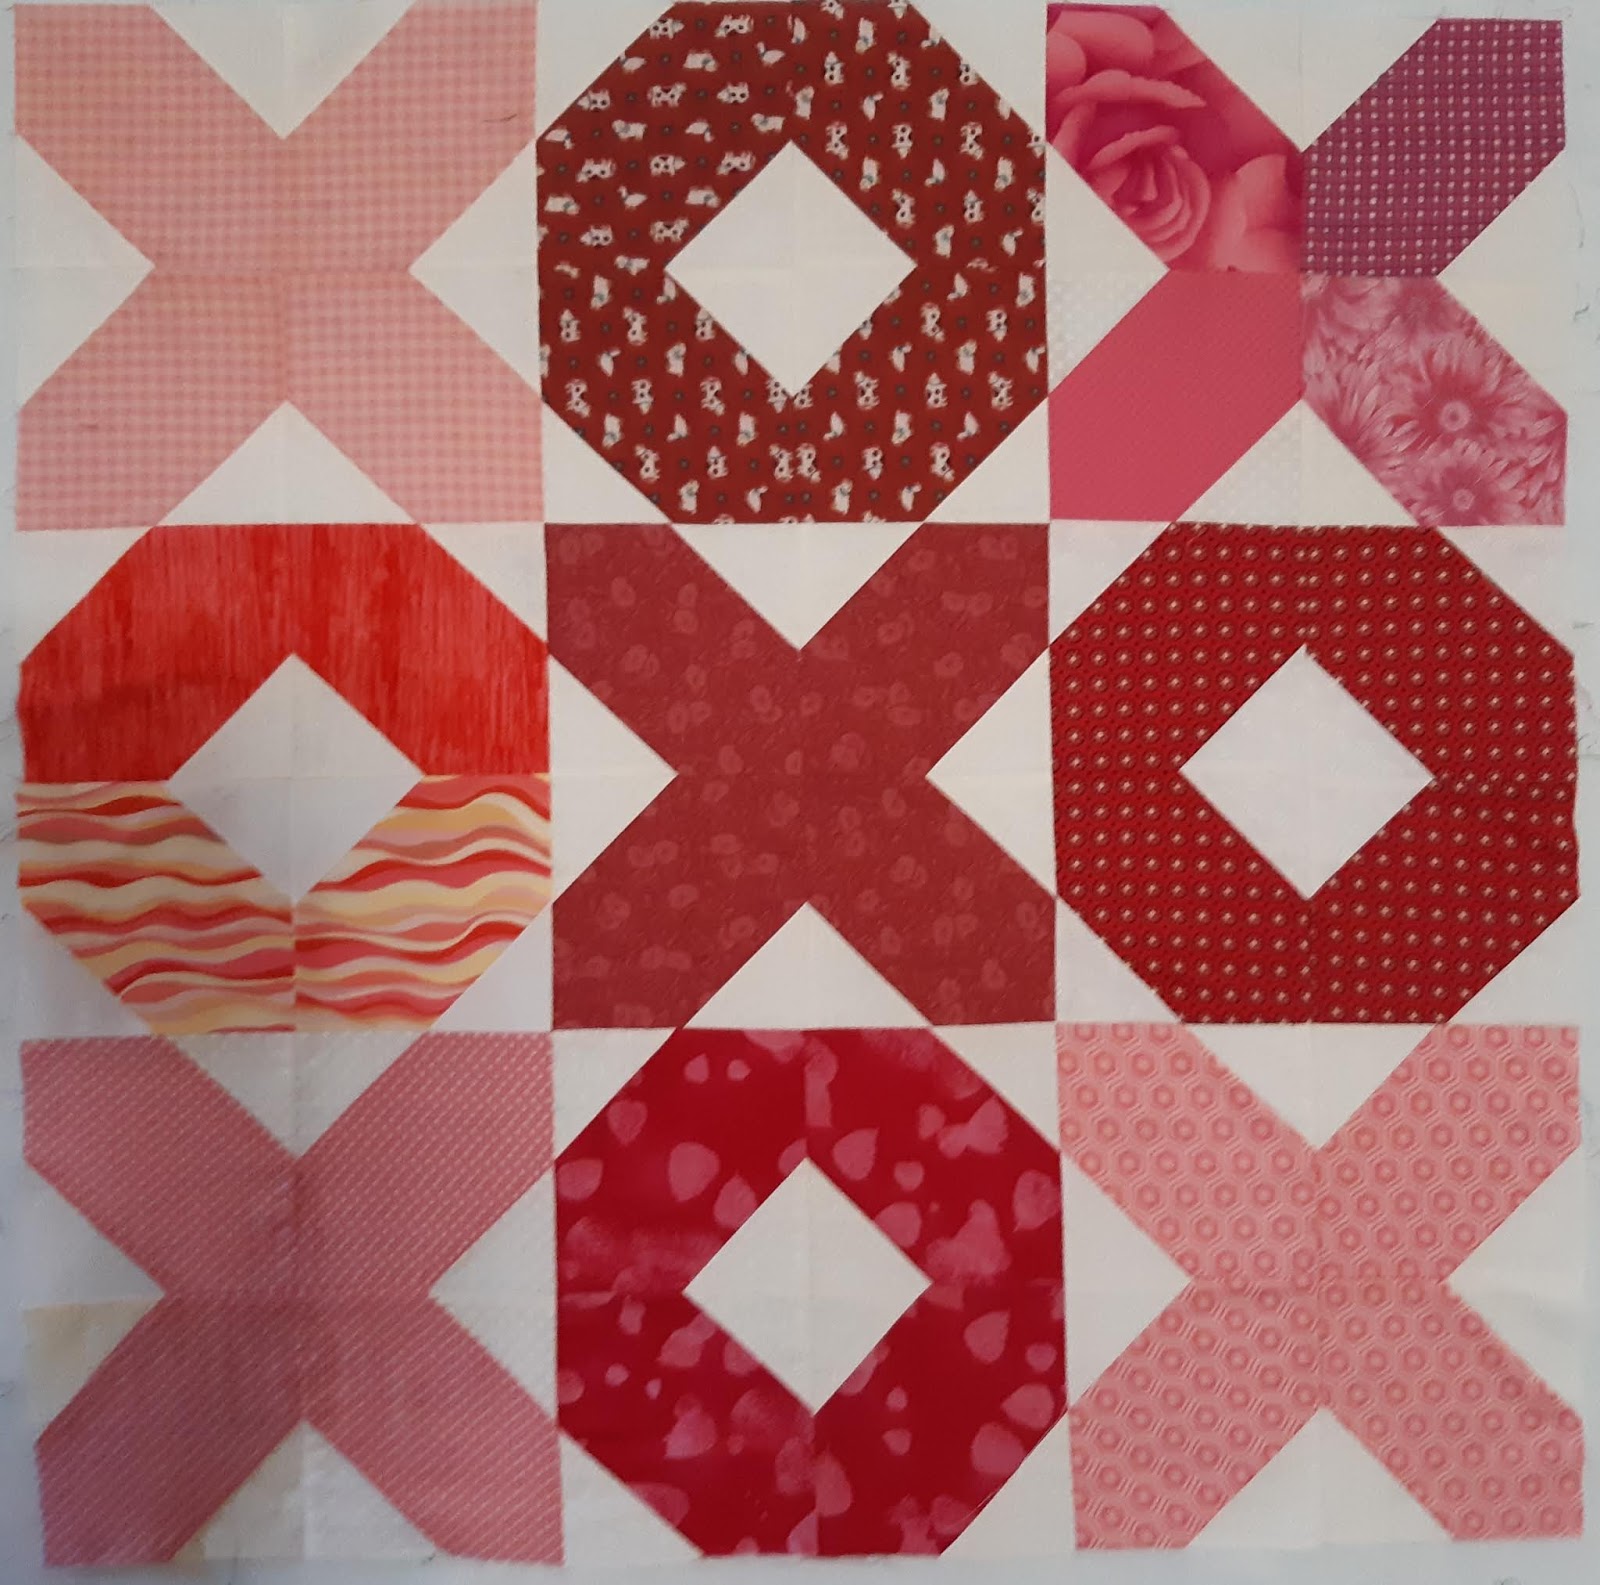
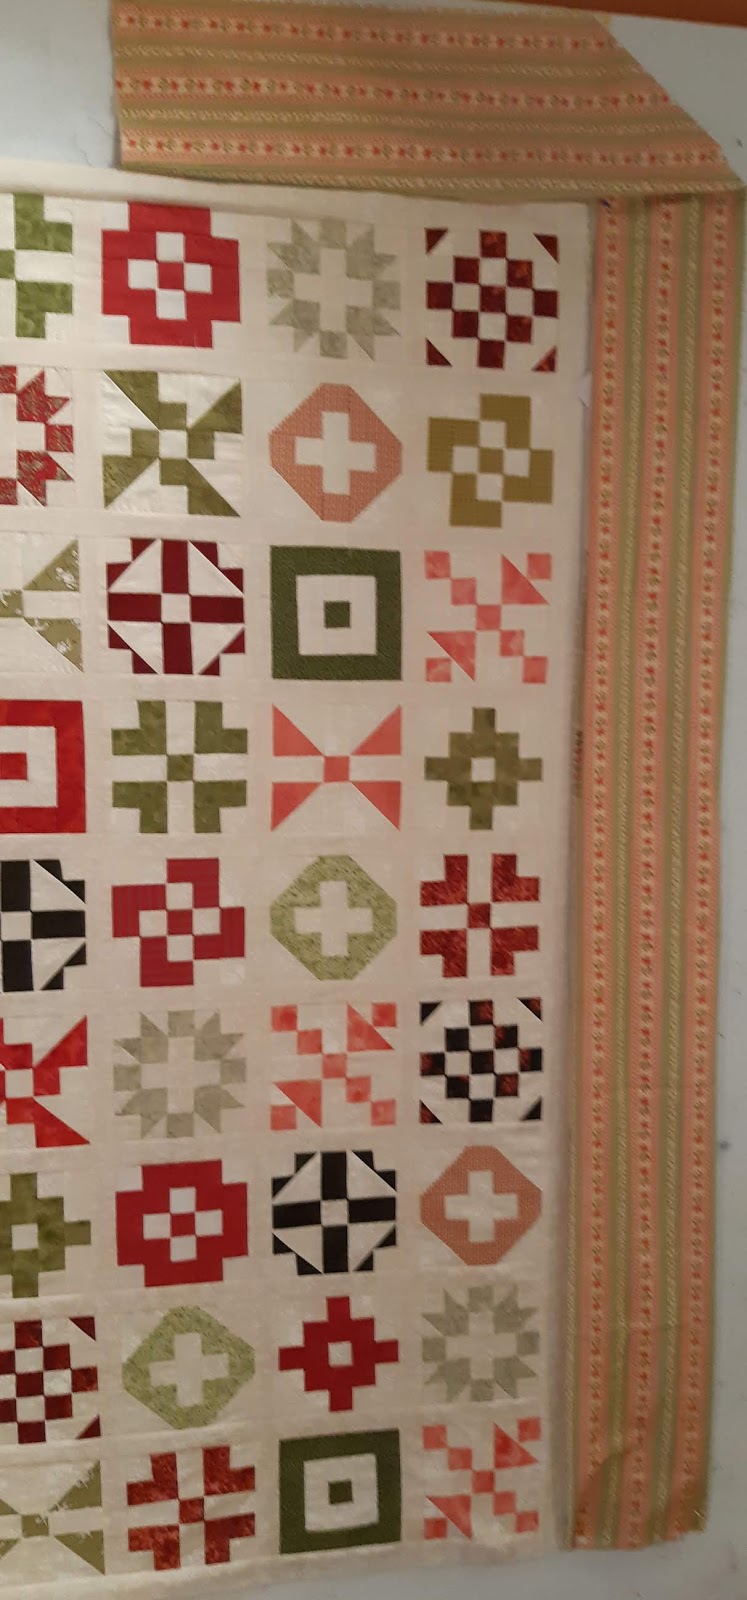
Last year a few X & O quilt blocks were left over from a guild sew day and a couple of months ago, I made two more X's and one O to be able to make an X & O comfort quilt using 9 blocks.  I also washed a red piece of flannel for the back as I knew it would shrink more than the top of the quilt and I was afraid the red dye would run as well.  I washed and rinsed it about 4 times before the water stopped turning pink.  Here's an indoors picture of the top before quilting.


This morning, I got the backing on the frame, cut a piece of batting and layered the top on and started free motion quilting.  I did "C" quilting from corner to corner in all the blocks as my base pattern.  If you look closely, probably not one of them is exactly the same size but standing back and looking the overall effect is fine.  Then I quilted a different design within each X and O, except for two which I both quilted with the words "hugs & kisses".  Here's an outside picture of the finished quilt.


Here are some detail pictures.
wiggles


cinnamon buns


flowers


hugs & kisses


random loops


stippling


moo, oink, baa, quack - because of the animals in the fabric


And here's the back.


Once I have the binding on and the quilt washed so the texture really shows up, I'll post some more pictures. 

Now, to choose which quilt to put on the frame next.....

Friday 2 November 2018

Fat Quarter Shop 2017 Patchwork Quilt Along, Quilt Top Finished

Today I cut the striped fabric and sewed the mitered borders onto the quilt.  We've been having rainy weather and with the lights on, the colours are not true.  Once I quilt it, I will have to get an outdoor picture.


Here's a close up of one of the mitered corners.  I'm pleased with how they turned out.


Now I have several quilt tops in the queue to quilt.  I have material I can use for backing for this quilt so no excuse to not get it finished soon.

Linking to Crazy Mom Quilts for Finish it up Friday.

Thursday 1 November 2018

Fat Quarter Shop 2017 Patchwork Qult Along - Almost a Quilt Top

I finished sewing all the small sashing pieces into the rows and then it was time to put long sashing pieces between each row.  This is not my favourite thing to do because it is hard to line up the small sashing rows so they stay in line across the long sashing row.  I remembered seeing a hint to mark the un-sewn side of the sashing strip where the sashing edges run out from underneath it before pressing it open so that is what I did.


When I sewed the next row on, I used the pencil marks to know where to line up the sashing on the next row.  It wasn't perfect, but it worked quite well in my opinion as you can see from looking at the same block above sewn into the quilt top.


Here isthe quilt top with the entire centre sashed and ready for the final border.  The quilt is currently about 50" by 55".


And here is the fabric I am planning to use for the border.  The reds and greens in the border print are the same colours as the lighter red and green prints used in the quilt.


I'll mitre the corners which is not something I do often but will look good with the striped fabric. Well, as long as it turns out well that is....

Monday 29 October 2018

What I'm Currently Working On

After I got the basket quilt top put together, and just before we went away on vacation, I pulled out another project that had the blocks all completed which just required putting them together and adding borders.  These are the blocks from the Fat Quarter Shop 2017 Patchwork Quilt Along.  I got them all laid out on the design wall and have the first two rows sashed together.


Then I got side tracked....  I love watching the Missouri Star Friday Tutorials with Jenny Doan and I really liked this one.   Missouri Star "Time to Sew" youtube quilt tutorial  I didn't follow it exactly but used it as the basis for my blocks.  My half square triangles finish at 2.5" which is half the size of Jenny's and I used them in all the corners of the blocks and did not use sashing.  I sewed twelve blocks together this morning and it is going to become a cover for my Q'nique Sewing Machine.


I have been wanting to make sewing machine covers for awhile now and the spools of thread seemed like the perfect pairing.  You must realize by now how I like themes!